

Building a simple Customer Relationship Management (CRM) system in Excel is a cost-effective way for small businesses and freelancers to track leads, customers, and interactions without investing in specialized software. This guide will walk you through planning, setting up, and optimizing your very own Excel-based CRM in just a few steps.
Table of Contents
- Introduction
- What Is a CRM?
- Why Use Excel for CRM?
- Step-by-Step Guide to Building Your CRM
- 1. Plan Your Data Fields
- 2. Create Your Master Table
- 3. Apply Data Validation
- 4. Use Conditional Formatting
- 5. Build Dashboards and Reports
- 6. Automate with Formulas
- 7. Protect and Share Your Workbook
- 1. Plan Your Data Fields
- Tips and Best Practices
- Conclusion
- Frequently Asked Questions
Introduction
A CRM helps you centralize all customer information—contact details, communication history, deal status, and more—into one place. While there are many cloud CRM platforms available, they can be costly or complex for smaller operations. Microsoft Excel, with its powerful tables, formulas, and visualization tools, can serve as an accessible entry point. In this post, you’ll learn how to design, implement, and optimize a CRM within an Excel workbook, giving you the flexibility to customize fields, automate follow-ups, and track performance.
What Is a CRM?
A Customer Relationship Management system (CRM) is a tool or process that helps you manage and analyze customer interactions throughout the sales lifecycle. Its primary goals are to:
- Organize customer data in a centralized repository
- Track communication and follow-up activities
- Analyze sales pipelines and conversion rates
- Improve customer satisfaction through timely engagement
By using a CRM, businesses can streamline their sales processes, maintain stronger relationships, and make data-driven decisions.
Why Use Excel for CRM?
- Low Cost & Easy Access
Most businesses already have Excel as part of their Office suite. There’s no additional subscription fee. - Customizable
You decide which fields matter—add or remove columns, rename headers, or modify layouts on the fly. - Familiar Interface
No steep learning curve: if you know basic Excel, you can set up and maintain your CRM. - Scalability for Small Teams
For solo entrepreneurs or small teams, Excel handles hundreds to thousands of records with ease. - Built-in Analysis Tools
Leverage PivotTables, charts, and formulas for quick insights without exporting data elsewhere.
Step-by-Step Guide to Building Your CRM
1. Plan Your Data Fields
List out all the information you need to track. Common columns include:
- Contact Name
- Company
- Email & Phone
- Lead Source
- Status (e.g., “New,” “In Progress,” “Closed-Won,” “Closed-Lost”)
- Last Contact Date
- Next Follow-Up Date
- Deal Value
Spend time tailoring this list so it reflects your unique sales workflow.

2. Create Your Master Table
- Open a new workbook and rename the first sheet to “CRM_Data.”
- In row 1, enter your field names as column headers.
- Select the header row and press Ctrl+T to convert into an Excel Table.
- Name the Table (e.g., tblCRM) via the Table Design tab.
Using a Table ensures that formulas and formatting automatically expand as you add new rows.

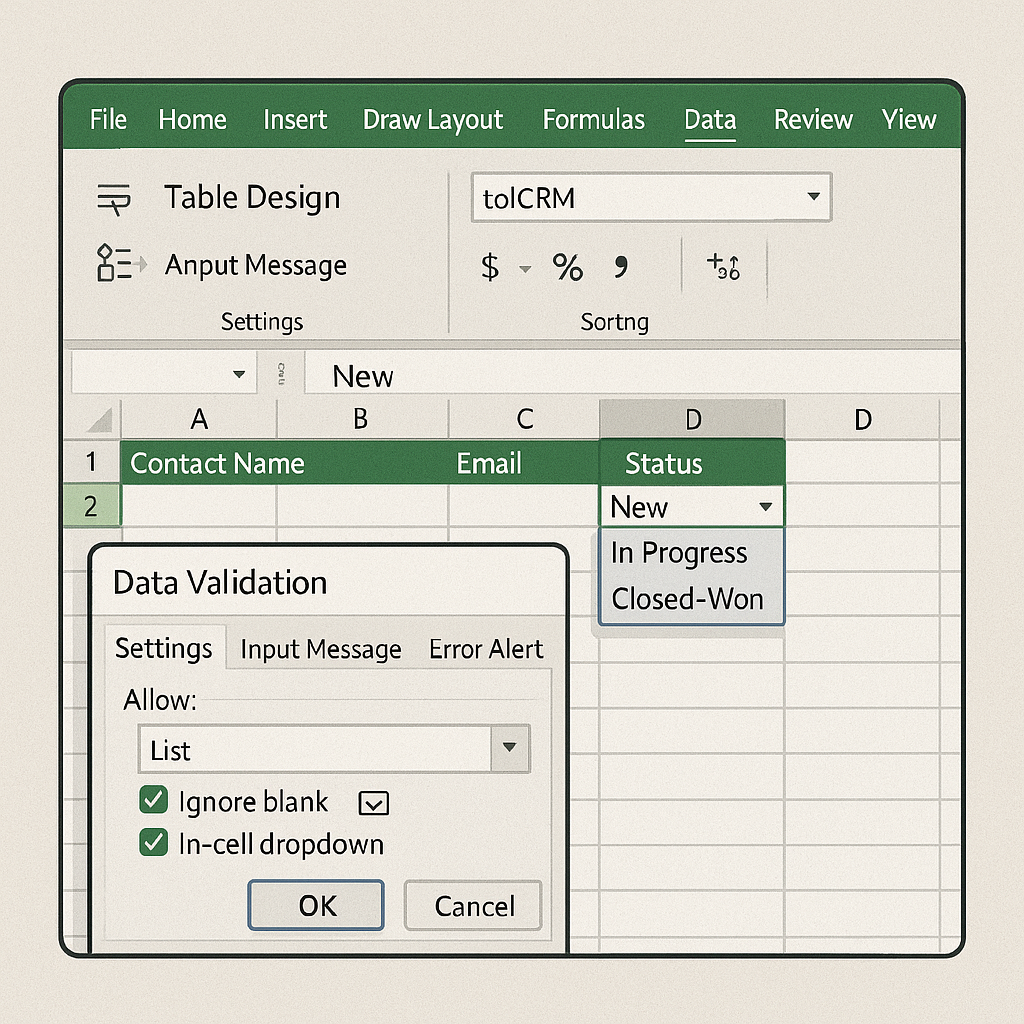
3. Apply Data Validation
Data validation keeps entries consistent:
- Select the “Status” column → Data → Data Validation → List → enter your statuses.
- Repeat for other columns (e.g., Lead Source, Priority, Region).
This prevents typos and makes filtering or reporting more reliable.
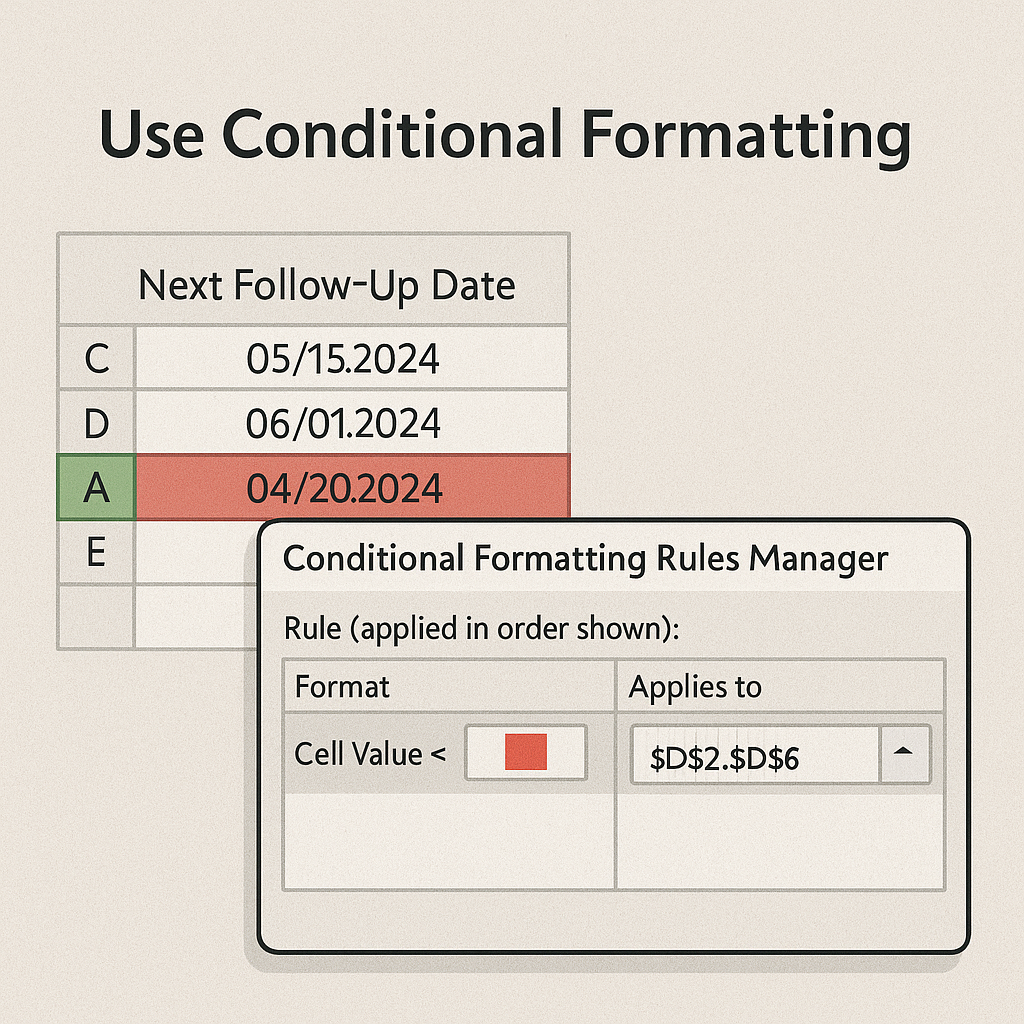
4. Use Conditional Formatting
Highlight key information at a glance:
- Overdue Follow-Ups: Select Next Follow-Up Date → Conditional Formatting → New Rule → Format only cells that contain → Cell Value < =TODAY() → choose red fill.
- High-Value Deals: Select Deal Value → Conditional Formatting → Top/Bottom Rules → Top 10% → bold or colored font.
These visual cues help you prioritize critical tasks.
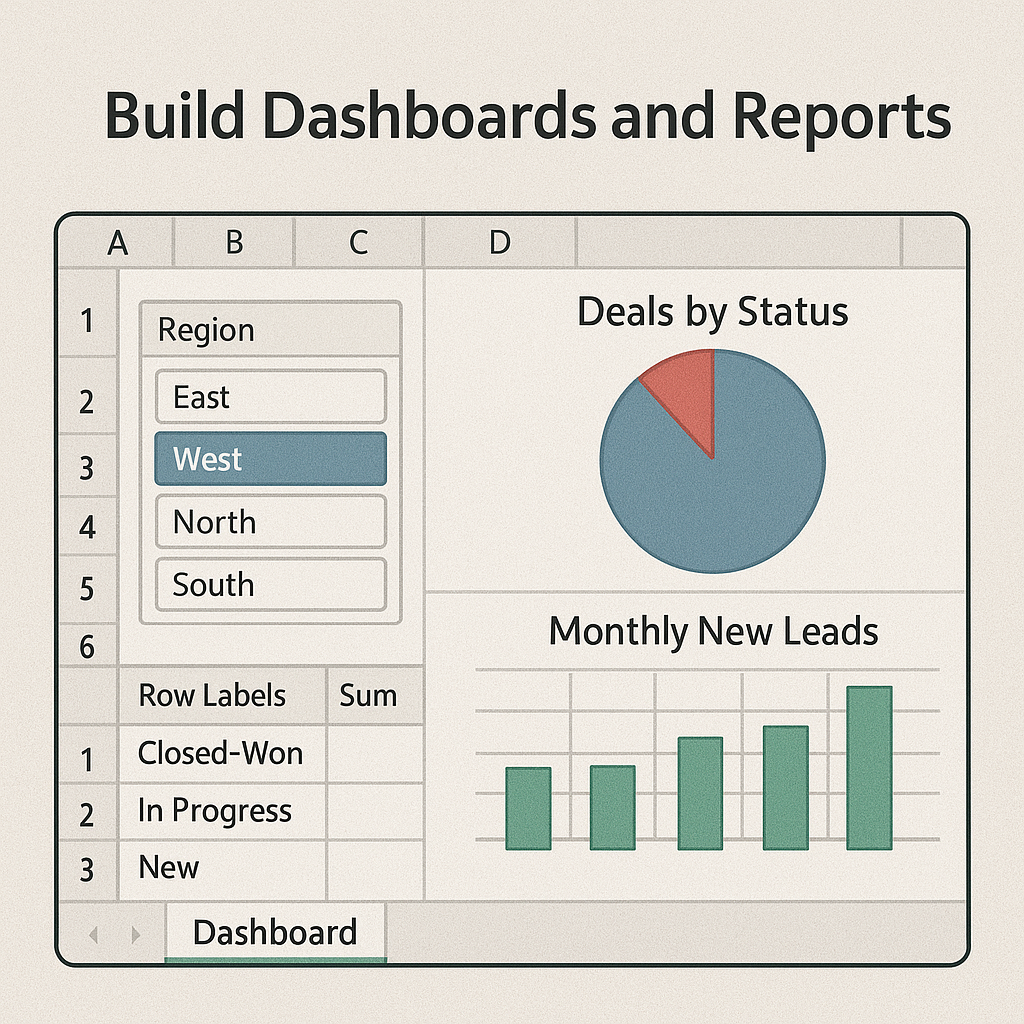
5. Build Dashboards and Reports
Create a separate sheet called “Dashboard.” Use PivotTables and PivotCharts to display:
- Deals by Status (e.g., pie chart)
- Monthly New Leads (column chart)
- Revenue Forecast (line chart based on weighted pipeline)
Link slicers to your PivotTables so you can filter by salesperson, region, or time period with one click.
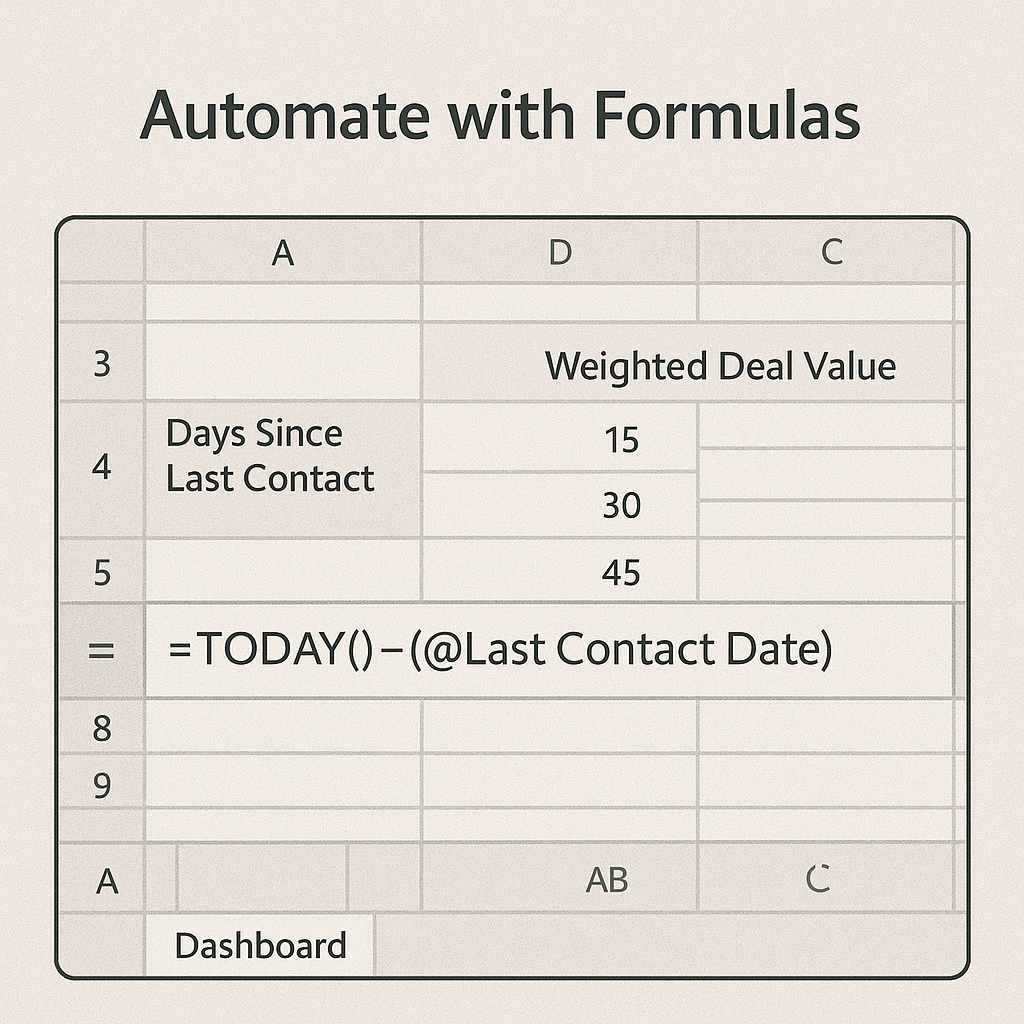
6. Automate with Formulas
- Days Since Last Contact: =TODAY() – [@[Last Contact Date]]
- Next Follow-Up Reminder:
=IF([@[Next Follow-Up Date]]<=TODAY(),
“Follow Up Today”,
“OK”)
- Weighted Deal Value: =[@Value] * (MATCH([@Status],{“New”,”In Progress”,”Proposal”,”Closed-Won”},0)/4)
These formulas reduce manual calculations and surface the most urgent records.
7. Protect and Share Your Workbook
- Protect Sheets: Review → Protect Sheet → restrict editing of formulas and structure.
- Password-Protect: File → Info → Protect Workbook → Encrypt with Password.
- Share Online: Save to OneDrive or SharePoint and invite team members with edit or view access.
This ensures data integrity while allowing collaboration.
Tips and Best Practices
- Back Up Regularly: Keep time stamped copies in cloud storage or a separate folder.
- Use Named Ranges: Simplify formulas by naming key ranges (e.g., Leads, Opportunities).
- Keep It Lean: Only track fields you actively use—too many columns can slow performance.
- Archive Closed Records: Move completed or lost deals to an “Archive” sheet quarterly to maintain speed.
- Train Your Team: Provide a one-page instruction sheet or short video on entering and updating records.
Frequently Asked Questions
Q1: Can I use Excel as a CRM for a large team?
Yes, for up to a few hundred records, Excel works well. For larger databases or simultaneous multi-user editing, consider a cloud-based solution like SharePoint or upgrading to a dedicated CRM platform.
Q2: How do I update records easily?
Use Excel Tables so new rows inherit formatting and validation. You can also use Form view (Developer → Insert → Form) or Power Apps for a more user-friendly interface.
Q3: Can I automate email follow-ups from Excel?
While Excel itself can’t send emails automatically, you can integrate it with Outlook via VBA macros or use Power Automate to trigger emails when certain conditions are met (e.g., Next Follow-Up Date = Today).
Q4: What are the limitations of a CRM in Excel?
Excel lacks built-in workflow automation, role-based permissions, and real-time collaboration on large datasets. Performance may degrade with tens of thousands of rows or complex calculations.
Q5: Is there a free Excel CRM template I can download?
Yes, sites like Someka, Vertex42, and Smartsheet offer free downloadable CRM templates. You can import one as a starting point and customize it to your needs.
Q6: How often should I back up my CRM workbook?
Weekly backups are recommended for active workbooks. If your sales cycle is fast-paced, consider daily backups or version history via OneDrive/SharePoint.
Conclusion
Creating a CRM in Excel empowers small businesses with a flexible, budget-friendly solution for managing customer information and driving sales. By thoughtfully planning your fields, leveraging tables, and automating key processes, you’ll have a centralized system that scales with your needs. As your business grows, you can always migrate to dedicated CRM software—until then, your Excel-based CRM will keep you organized and on top of every opportunity.
For a full tutorial and guide on How to Create CRM in Excel please visit this link